Job Posting DirectLink Page Set Up
Think of your DirectLink page as a free web page dedicated to your job posting. There is no cost to create it, no need to renew it, and no other companies to compete with. The DirectLink can be formatted to include your logo and you control the design of the page. Applicants can apply to your job from this page – just as they would a jobs website. And if you’ve configured your application settings to use the online form – your applicants will come directly into InsuraSeek.
Just like the application page, you can build this page using the same tools you used to design your form. Before we review the steps, here are some recommendations for formatting your DirectLink page:
• Use a good logo/image banner at the top of the page
• Create a good “headline” to entice your candidate to apply
• Use the 2nd column of the page to call out highlights of the job
Step One: Let’s review the process for setting up a good DirectLink page by visiting Step Three in the job posting process. To access the third step, remember to navigate to the location folder in your tree, then over to the Job Posting tab on the right hand side of the application.

Step Two: Your DirectLink page will require you to design the look of the page viewers see when they click your web link. You will notice a few fields are already in the DirectLink page by default: The job title you entered, the location, the job description, and apply buttons.

Step Three: We recommended that add some elements here like your logo and perhaps a headline above your job description, to encourage applicants to apply. Also, we recommend using the right hand side bar to drop in details or highlights about the job so applicants can quickly scan the “highlights” of the position. Using the page builder tools we reviewed when you set up your applicant page, we can optimize this page so it looks inviting. Begin with adding a logo at the top of the page. If you hover above the Job Title field, you’ll see a line appear, with a grey “plus sign” on the left hand side.
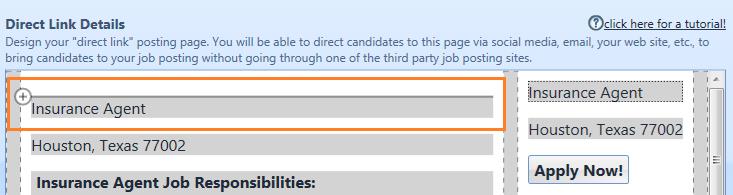
Click that grey plus, to view the field chooser list of optional content you can add to your posting.

Select the Image option from the chooser list, to drop in a company logo or web banner at the top of your DirectLink page.

Remember, you can adjust the size of your image by manipulating the box around your image, and adjust its position on the page using the format bar. If you don’t like the image you selected, use the black “x” to remove the image from the page.

Step Four: Next you may want to bump up the size of your job title. By clicking into the job title, you activate the html bar. Use that bar to change the look of your job title and make any adjustments to the job location by repeating this action.

Step Five: Just above your job title, and below your logo or banner, you may opt to drop in a headline to encourage applicants to learn more about the job. Hover between the logo and your job title, and use the grey “+” to choose “Header” from your field list. This will insert a field with a large, bolded font you can use to write a headline for your job.


Step Six: You’ll notice your job description has carried over from your job details section of your job posting, and beneath, an apply button to direct interested prospects to apply for your job based on the application button. While you can add any additional information you like by selecting fields using the field chooser on the page, we also suggest using the right hand column of your DirectLink page to drop in additional content.

Step Seven: On the right hand column you may want to drop in highlights about the job using your field chooser. We suggest highlighting: the job title, location, the skills you are looking for and your company description – if it is no more than 3-4 sentences. For example, to add a section highlighting the skills required for the job, drop in a Header field, called “Skills” and then use the job posting fields in your field chooser list to drop in macros from your job posting.

Step Eight: To drop in the company description, add a headline field, and then, drop in the company description from the job posting macro options.

Step Nine: When you have completed editing your DirectLink page, you will be ready to proceed to your next step – selecting job posting destinations. Alternatively, if you don’t plan to post to any job boards, you can opt to publish your posting to save your DirectLink for use.

Step Ten: Later, once you’ve completed your job posting in it’s entirety, you can view your DirectLink page by clicking the view link in your saved job posting:


Step Eleven: Be creative in where and how you share this link. The more you share it, the greater your candidate reach. Here are some suggestions on how to circulate your DirectLink jobs page once you have built it:
• Embed the link in your LinkedIn status and profile
• Share the link in any groups you are associated with on LinkedIn
• Share the link on Twitter a few times a week
• Share on your Facebook page and any office pages
• Share on Google+
• Embed the link in your email signature block in places like gmail, Outlook and other email clients
• Email the link to people in the office and ask them to share your link as well