Job Posting Application Page Set Up
If you have chosen the Online Page as your preferred method for applicants to apply to your position, you have the advantage of coming directly to your InsuraSeek product for quick and convenient candidate management.
When done right the first time, your application page serves as the template for any future job postings you may build. To begin, we suggest you create a checklist of things your application page should accomplish. Our recommendations include:
• An attractive logo at the top of the page
• The name and location of the position
• A brief statement that tells the applicant what to expect after submitting their resume
• A method for submitting the resume
Step One: Let’s review the process for setting up a good application page by visiting Step Two in the job posting process. To access the second step, remember to navigate to the location folder in your tree, then over to the Job Posting tab on the right hand side of the application.

Step Two: Your application page set up, will require you to design the look of the application page viewers see when you have selected the online form method of application. You will notice a few fields are already in the application page by default: The job title you entered, the location, required fields where the applicant enters their contact information, resume upload options and an apply button.

You’ll see we have a few things we recommended that you will need to add here. Your logo and some descriptive information about the application process should be added to this page to provide your applicant with a positive experience. If you hover above the Job Title field, you’ll see a line appear, with a grey “plus sign” on the left hand side.
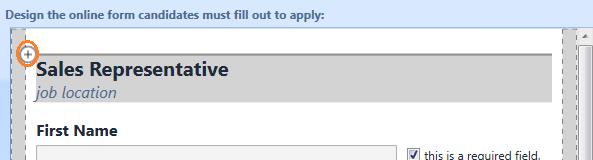
Click that grey plus, to view a field chooser list of optional content you can add to your posting.

The chooser list will provide different types of fields you can use to customize your form. The first three options are macro fields, similar to the ones you use to customize your emails and reminders. You can import fields related to the contact, such as name, email or location.

Custom Input fields allows you to drop in macros from any custom detail fields you may have built in your candidate detail tab when setting up your InsuraSeek product.

Job posting fields drop in macros from your job posting – including the title, location, description and skills.

The Header, Label and Paragraph fields are free form text fields to drop in Headline content, of text.

The next two fields, Image and Line Space allow you to alter the look of your application page by dropping in an image, or adding a line of white space when you want to put a little “breathing room” between two fields.

The final two options are already inserted by default in your application page: The Resume Input method, and the Apply Now button.

It would be good to drop the company logo at the top of the application page, so it reflects your recruitment brand. Select Image from the drop down list and then insert your company logo or banner image in the pop up dialogue box:

Step Three: When your logo or banner is in place, you can alter the size or position of the image by manipulating the corners of the logo file, or change it’s position on the page using the format bar. If the image is not what you wanted to use – you can delete it, and any field, by clicking the black “x” in the upper right hand corner.

Step Four: When you have your logo inserted, you’ll want to review your job title and location fields to ensure they are accurate. The Job title should have carried over from the job title you entered during step one. The same will be true of the location field.

Step Five: Consider using the paragraph field from the drop down chooser list, to create a text space you can use to tell the applicant what to expect after applying for your position.

Step Six: When you have selected a field like paragraph or header or label, click into the field to activate it so that you can begin entering text.

When you are done, click outside the field to view your content and determine if you want to make any format or content changes.

Step Seven: To add some white space around any feels you enter, move your cursor between fields, and use the “grey plus” to select “line space” from the field chooser list.

Step Eight: Review your contact fields, and determine which ones you want required for the applicant to submit their resume.

Step Nine: If you need to add any fields at the bottom of your page, you’ll note the Insert drop down button, which shows you your chooser fields.

When you have your fields completed, you will be ready to move to the next step in the job posting process – determining your application settings. Your completed application page will look something like this:

Step Ten: Later, once you’ve completed your job posting in it’s entirety, you can view your application page by clicking the view link in your saved job posting:
